Wednesday, June 30, 2010

Rice for Dessert?


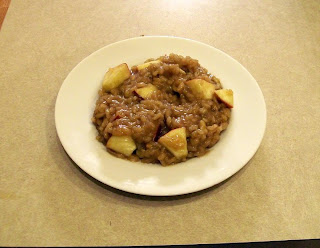
So I think most people have probably seen one particular celebrity chef who insists that contestants on his show know how to make risotto. To be fair, he's probably right, risotto really is a dish that any chef should know how to make. The only problem is that  until a few months ago I'd never made it. For my first batch, I found a couple of recipes online, took the best parts of each ingredient list, and started cooking. I was happy with how it came out, but I felt like I needed more practice (and I probably still do). A few days later I got out the arborio rice again and decided to make up my own recipe. Using the ingredients I had, I came up with this dessert recipe.

Apple Cinnamon Dessert Risotto

3/4 Cup champagne
3 Cups apple juice
3/4 Cup Arborio (or other medium white grain) rice
2 tablespoons butter, divided
1/2 medium apple, chopped
1/4 cup walnut chips
1/8 tsp salt
1/4 tsp ground cinnamon
1/8 teaspoon ground nutmeg

Place the apple juice in a teapot and bring to a simmer.

In a medium saucepan, melt 1 tablespoon of the butter. Add the Arborio rice and stir to coat in the butter. Continue toasting the rice, stirring constantly, for about 3 minutes. Add the Champagne and simmer until the liquid has almost evaporated, about 3 minutes. Add 1/2 cup of the simmering juice and stir until almost completely absorbed, about 2 minutes. Continue cooking the rice, adding the juice 1/2 cup at a time, stirring constantly and allowing each addition of juice to absorb before adding the next, until the rice is tender but still firm to the bite and the mixture is creamy, about 20 minutes total. Remove from the heat. Gently stir in the apple, remaining butter, walnuts, salt, cinnamon and nutmeg. Spoon into serving dishes. Serve with a champagne/apple juice cocktail made of equal parts of each (chilled, of course)

Sunday, June 27, 2010

Winemaking, Day 1


There are many ways to make wine, and it really can be as easy or as complicated as you want to make it. Over the next few weeks, I am going to walk you through the basics of winemaking from a kit. For this set of posts, I will be following the kit directions pretty much to the letter. That means that in approximately 28 days, wine will be in bottles, and 30 days later, I will open the first bottle. As you follow along over the new couple of weeks, I hope that you will see how easy this is, and that some of you will consider trying this yourself.

Day 1

Today, you will need a brewing bucket of 6.5 gallons or so, a large spoon/stirring rod, and your wine kit. If possible, you should also have a hydrometer. This is used to measure the specific gravity of the wine must, or liquid. This tells you the amount of sugar in the liquid, which in turn can be used to figure out the potential alcohol level of the wine. But more simply, measuring the specific gravity is also just a way to track the progress of the fermentation. Regardless, this isn't a necessity, just a nicety.

Start out by reading through all of the instructions. Not just those for day 1, but for the whole process. We will be following the instructions from the kit I'm using, which is a Semillon-Chardonnay kit from Amazon.com.

Step 1, put 2 qts of warm water in your fermenting bucket. Slowly add the bentonite, stirring thoroughly, until it is fully blended with no lumps.

Step 2, pour the contents of the juice bag into the fermenter. Refill the bag with 2 cups of hot water, close, and shake. Pour this into the fermenter too. Repeat a second time, and you should have gotten all the juice concentrate out of the bag and into your fermenting bucket.

Step 3, fill the bucket the rest of the way up to the 6 gallon mark with room temperature water. This is the time that you should take a reading with your hydrometer if you have one. Follow the instructions that came with it.

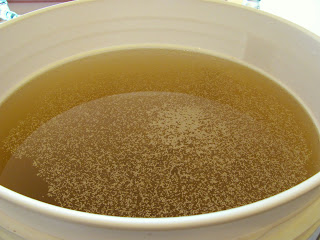
Step 4, Carefully pour the yeast over the top, and then cover the bucket. This is what you see in the picture. Now, just cover the fermenter and let the yeast do its work.

We'll be back in a week to take the next steps. 

Thursday, June 24, 2010

Pita Pizza, a Guest Spot


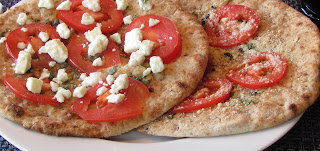
Every once in a while I come across a recipe which is so good that I have to add it to my regular repertoire. I do give credit when I steal a recipe though, and this is one of those cases. A few months ago my girlfriend was making dinner and came up with this recipe. It tasted great and was extremely easy to make, so I've made it a ton of times since then. So, thanks to Jen, here's a great snack or meal that you can make at home. For reference on the picture, one on the left is the original recipe, one on the right is made with shredded parmesan.

Flatbread/Pita Pizza

2 pieces of pita bread
1 1/2 tbsp extra virgin olive oil
1 tsp coarse sea salt
1/2 tsp fresh ground pepper
1 tsp fresh basil, finely chopped
1 roma tomato, sliced thin
2 oz crumbled feta

1. Preheat oven to 350F
2. Drizzle 3/4 tbsp or so of olive oil on each piece of pita bread
3. Sprinkle with salt and pepper to taste. Err on generous side with the salt.
4. Sprinkle fresh basil over the pizza
5. Slice the tomato very thin, and spread tomato pieces out to cover the pita bread. Do not layer the tomatoes.
6. Spread crumbled feta over the tomatoes.
7. Put in oven for 5-10 minutes, or until cheese starts to glisten
8. Remove and enjoy

Notes: You can use other cheeses if you want. A quality, aged, parmesan works great, as does your regular cheap parmesan from a green bottle. Dried basil can be used in place of fresh. Other flatbread, naan, etc, can be used in place of pita.


Want to see something in particular here on Joel's Food Blog? Looking for a recipe for a dish but don't want to take the chance on an untested recipe? Send me an email to Joel at joelsfoodblog.com and let me know and I may post the recipe for you in a future edition of Joel's Food.

Tuesday, June 22, 2010

Lasagne takes a Mediterranean Vacation


One of my favorite foods through the years has always been lasagna. The layers of meat, cheese and pasta all blend together into something amazing. My friend Scott gave me a recipe for Moroccan meatballs and sauce last year that was great. One day while working on something else and thinking idly of food, I wondered how that recipe would work as the basis for a lasagna. A bit of research and experimentation later, and this what I ended up with. Tastes pretty darn good, if I do say so myself. If you want something a bit more authentic than the mozzarella, find a middle eastern grocery store and get some Akawi cheese instead.

Middle Eastern Lasagna

8 oz mozzarella cheese
3 oz crumbled feta cheese
1 large egg
1 tsp chopped parsley
10.5 oz package goat cheese
1 lbs ground lamb

Sauce ingredients
2 Tbsp ground coriander
2 Tbsp Ground cumin
1 tsp curry powder
1 Tbsp garlic powder
1 tsp dried oregano
1 tsp dried thyme
¾ tsp ground mustard
¾ tsp paprika
1 tsp cinnamon
½ tsp chili powder
1 tsp kosher salt
½ tsp black pepper
1 Tbsp parsley, minced
2 Tbsp olive oil
2 shallots, minced
3 cloves garlic, minced
1 29 oz can tomato puree

1. Preheat oven to 375F

2. Sauté shallots and garlic in olive oil. Add lamb to pan, and sauté until brown. Add the rest of the sauce ingredients to pan, bring to a boil, then cover and simmer for 20 minutes.

3. Combine goat cheese, egg, 1 tsp parsley and 2 oz mozzarella cheese. Set aside

4. Spray bottom of 9x13 pan with cooking spray. Put down 3 sheets of phyllo dough. On top of dough, put 1/3 of the meat and sauce mixture. Put 3 sheets of phyllo dough over the meat sauce. Dot this with 1/2 of the goat cheese mixture. Do not try to spread the cheese mixture, as it will just tear the phyllo dough. Repeat these layers until you run out of dough, meat sauce and cheese. On the top layer of phyllo dough, spread the crumbled feta, and then cover all with the remaining 6oz of mozzarella cheese

5. Cover pan with foil, and put in middle rack for 35 minutes

6. Remove foil and turn oven down to 300F. Cook another ten minutes, until edges are golden brown.

7. Remove from oven. Let lasagna sit for ten minutes before cutting.

8. Enjoy!

Monday, June 21, 2010

Readers, meet Winemaking


As I've mentioned previously, I enjoy making, and of course drinking, wine at home. I’m sure many of you are having images of crates full of grapes, maybe stomping them to get the juice, etc. The wonders of modern technology make things so much easier. To prove this, will introduce you to the wine kit.

A wine kit gives you all the ingredients you need to create 6 gallons (30 bottles), of nice drinkable wine at home. There are varying levels of quality in the kits, but if you follow the included instructions, pretty much anyone can make a decent wine at home, often in less than a month. With some relatively simple tweaks, and a bit more time, you can make it even better, at little or no additional cost.

The ingredients you will find in any particular wine kit will vary by manufacturer and product line, but the basics will generally include, but not be limited to, the following:

Juice concentrate: This of course is the actual grape juice that becomes the wine. This package (generally a double walled plastic bag with large plastic cap), will contain anywhere from 5 to 23 liters of grape juice. This juice will already have been balanced as to acidity, tannin, sugar content, etc, to make a quality batch of wine. It will also tend to conform to levels in previous batches of that wine kit made by the manufacturer in the past. This lets you make a consistent product, and if you find a wine you like one year, it will (hopefully), taste the same if you buy another kit of the same wine the next year.

Yeast: This of course is the workhorse of the whole process. Yeast is a living organism that consumes sugar, and releases the ethanol that changes that grape juice into tasty wine. This process, which is known as fermentation, also releases carbon dioxide, which is helpful in beers, but can be annoying in winemaking.

Potassium Metabisulfite: One of the primary enemies of wine is oxidation. An oxidized wine will taste rather flat or stale. This is why wine is sealed under a cork or screw cap when it is in the bottle. While the wine is being made though, sulfites protect the wine from oxidation. Potassium metabisulfite also works with Potassium sorbate, which is next up on the list.

Potassium sorbate: When wine is fermenting, the yeast releases carbon dioxide. If this is still happening after you cork it, you will eventually end up with a wine explosion. This is because the mounting carbon dioxide will raise the pressure in the bottle until the cork bursts out. Not exactly something you want to happen, especially with a red wine. Potassium sorbate, along with potassium metabisulfite, helps combat this problem. It doesn’t stop fermentation, per se, as so many people think. What it does do though is keep the yeast from reproducing. So once the current yeast in your wine dies off, the fermentation will stop.

Clearing Agents: As the name would indicate, clearing agents help clear the wine. The fermentation process, and even the grape juice itself, contains various impurities, contents, etc, that keep you from having that wonderful clear glass of wine that you are used to. While they may not affect the actual taste of the wine, they aren’t attractive, and can put you off a glass of wine.

Bentonite: The first clearing agent you will generally see and use is bentonite. This is generally added at the start of fermentation, before anything else. This is because the yeast will cling to the bentonite and drop out of suspension faster. The alcohol will still be formed, but the yeast won’t hang out floating in the wine and leaving it hazy. When you open the package, your first thought will probably be that it looks like kitty litter. This idea isn’t far off. Like many kitty litters, bentonite is a type of clay. Don’t worry though; your wine won’t taste like a litter box.

Kieselsol and Chitosan: Chitosan is a shellfish derivative, so be aware of this if you have any type of allergy. Impurities that make your wine cloudy will have either a positive or negative charge. These clearing agents each bond with impurities of a specific charge, and pull it out of suspension. You do want to make sure that you pay attention to the instructions as to which order and how to add them. If you get them reversed, the two clearing agents will just bond to each other, rather than the impurities in the wine, and then you’ll still have a cloudy wine.

Optional items: These are some other things you might find in your wine kit

Grape pack or raisins: More expensive red wine kits will often include these. Grape packs or raisins help add more body and flavor to the wine. This of course goes along with fact that most red wines are fermented on the grape skins, at least for a short time.

Oak: Many wine kits will have oak with them. This may be in the form of sawdust (yes, this looks exactly like you’d expect), chips, cubes, or spirals. These helps impart an oaky flavor to the wine, and can also absorb some of the sharper flavors. Not all kits will have them, or can even benefit from them, so don’t add oak to a kit that doesn’t have it unless you’re sure it will be an improvement.

Elderberries or elderflowers: These add to the flavor, and help round out a wine’s flavor profile

Starting next week, I will chronicle making a batch of wine from start to finish. If you'd like some more information before that though, check out the following sites:

Tim's Wine Blog Tim is the Technical Manager for Winexpert, one of the largest wine kit manufacturers in the world, and the maker of the kits I first started out with. A very interesting character and one of the nicest and most knowledgeable people on the Internet when it comes to wine kits.

Winepress.us Wine Forums These forums are a great resource for research and asking questions. A great group, they're always happy to answer questions and help someone out with an issue.
Saturday, June 19, 2010

Tuna Noodle Casserole, Improved


Most of us at one time or another have had the ubiquitous tuna noodle casserole. Some spaghetti or macaroni noodles, a can of tuna, a can of cream of mushroom soup, some green peas, maybe cheese melted over the top. The very idea brings up memories of camp chow lines or school cafeterias. Does it have to be this way though? Why can't we take the idea of tuna noodle casserole, and turn it into a gourmet dish? After asking myself this, I felt that I wanted to take the challenge, and here's what I came up with.

Seared Ahi Tuna and a Mushroom Pea Cream Sauce

4 Ahi Tuna Steaks
1 cup soy sauce
2/3 cup rice vinegar
5 tbsp butter
1/4 cup flour
2 cups half and half
1 cup seafood stock
1/4 cup finely chopped onion
2 cloves garlic, finely minced
1 cup sliced shiitake mushroom caps
3/4 cup petite green peas, frozen
1 tsp thyme
1 tsp sea salt
1/2 tsp fresh ground pepper
8 oz angel hair pasta
1 1/2 tbsp sesame oil

1. Mix soy sauce and rice vinegar, and put over the tuna in a covered container. Put in refrigerator to marinate for 20 minutes
2. Cook pasta al dente, following directions on package. Drain, toss with sesame oil
3. Melt butter over medium-low heat. Add flour, stir until smooth. Turn heat up to medium, and cook for 5-6 minutes, until sauce reaches a nice tan color.
4. In another pan, or electric teapot, mix half and half and seafood stock. Heat, but do not allow to boil
5. Slowly add half and half/stock mixture to sauce, 1/2Cup at a time. Whisk each addition until smooth, then add another 1/2 cup.
6. Add onion, garlic, mushrooms, peas and seasonings and turn heat to high. Cook for ten minutes, stirring continuously. Remove from heat and cover.
7. Grill tuna to order. I prefer the tuna just seared, about 3 minutes on each side for my grill.
8. Put pasta on plate, pour some sauce over it. Then add sliced tuna and some more sauce. Enjoy

Serves 4

Thursday, June 17, 2010

Orange Cinnamon Cookies


One of my favorite snacks long ago was orange cinnamon rolls. A few months back, while trying to come up with ideas for a new cookie recipe, I remembered how good these tasted. I figured that I could make cookies that have the same taste, but weren't as messy to eat. A bit of dabbling later, and you can now share the wonderful results of this strange thought process

Orange Cinnamon Cookies

1 C butter
2 C sugar
2 eggs
1 C buttermilk
1 tsp baking soda
2 tsp vanilla extract
1 tsp orange extract
4 C flour
1 C cinnamon chips

4 tbsp butter
2 C powdered sugar
2 tsp vanilla extract
3-6 tbsp hot water

Preheat oven to 375F

1. Beat butter until fluffy. Add sugar, beat until mixed. Add eggs and buttermilk, beat until smooth. Add vanilla, orange extract, baking soda, beat until mixed. Mix in flour 1C or so at a time until combined. Use spatula to fold in cinnamon chips.

2. Drop onto cookie sheets in approximately 1.5 tbsp size

3. Cook 10-12 minutes

4. Put on rack to cool.

5. Melt butter in saucepan over medium-low heat. Add vanilla extract and powdered sugar, stir until smooth. Add water 1 tbsp at a time until reaches desired consistency. Use a pastry brush to spread icing on each cookie.

Enjoy!!

You can now find these cookies on our Etsy store!

Friday, June 11, 2010

Paging Doctor Sauce


Most people I know of scoff at the idea of making their own pasta sauce. At most, it seems they'll be willing to open a jar of sauce, put it in a pan, and warm it up. Some won't even warm it up, and just eat the sauce cold.

Rather than just accept this state of affairs, I thought I'd lay out a simple method to greatly improve the taste of that store-bought sauce, with very little work required. This works with your cheap cans or your most expensive jar sauces, or anything in between.

1 cup red wine (I used some of my homemade Barolo. More on winemaking in a post soon)
1 small onion, chopped
2 cloves garlic, minced
1 tsp basil
1/2 tsp thyme
1/2 tsp oregano
2 tbsp extra virgin olive oil
1/2 cup shredded parmesan cheese
1 jar pasta sauce of your choice
Salt and pepper to taste

1. Put wine, onion, garlic, basil, thyme and oregano in a saucepan on medium-low heat and reduce*, stirring occasionally to make sure it doesn't burn to pan.
2. Add olive oil, sauce and parmesan cheese and turn heat down to low. Simmer for 20 minutes or so, stirring occasionally. If you want meat sauce, this is the time to add the meat too, to let all the flavors meld together.

For best meal, cook your pasta to not quite Al dente (which means still somewhat firm, but not hard), and drain water. Then stir the pasta into the sauce and remove pan from heat. It will complete the cooking process from heat of the sauce, avoiding the problem of overcooked pasta.

* This means to slowly simmer it and let the liquid evaporate off, leaving just the tastiest parts of that red wine soaked into your onion and spices.

Monday, June 7, 2010

Peanut Butter and Jelly Cookies


Everyone loves peanut butter and jelly sandwiches, and peanut butter cookies have always been a favorite of mine. So why not combine the two?

1/2 cup butter
3/4 cup peanut butter
1/3 cup sugar
2/3 cup brown sugar
1 large egg
1/2 tsp vanilla
1 1/2 cup whole wheat pastry flour
3/4 tsp baking soda
1/4 tsp fine sea salt
Jam or Jelly of your choice

1. Preheat oven to 350F
2. Mix first six ingredients
3. Add rest of ingredients (except for the jelly/jam)
4. Mix well
5. Roll into balls and press thumb into center
6. Fill thumbprint depression with jam or jelly
7. Bake 8-10 minutes on ungreased cookie sheet

Note: Sprinkle top of cookies with sugar to add a bit of extra sparkle and sweetness

You can now buy these cookies from our shop on Etsy!

Friday, June 4, 2010

Bourbon Banana Cake Filling


I love bananas. They’re tasty, they’re useful when you get muscle cramps, and they come with their own wrapper so you can easily throw them in your bag as you leave the house and have a snack later. But I rarely see any recipes for them. Banana bread, bananas foster, banana splits, one or two others, but not a lot to choose from. Last week I decided I would add one of my own to the list:

Bourbon Banana Cake Filling

4 Bananas, smashed
1 cup light brown sugar, packed
2 large eggs
1/3 cup bourbon
½ tsp nutmeg
½ tsp vanilla extract
Pinch sea salt
2 tsp corn starch (to thicken)

Put all ingredients but cornstarch in a saucepan on low heat. Simmer for 15 minutes, stirring occasionally, until combined into a nice caramel color. Add cornstarch and continue to simmer and stir until thickened.

Makes enough filling for a full sheet layer cake. Adjust amounts as needed

Note:
If bananas are particularly sweet/ripe, reduce sugar to 3/4 cup.

I used this as filling in a devils food layer cake and it was great. You could also use this as an ice cream topping. Vanilla ice cream, bourbon banana topping, and hot fudge would be heavenly. Or skip the hot fudge and sprinkle walnuts on top for a banana nut sundae.